Kertaki Boss Battle Strategies
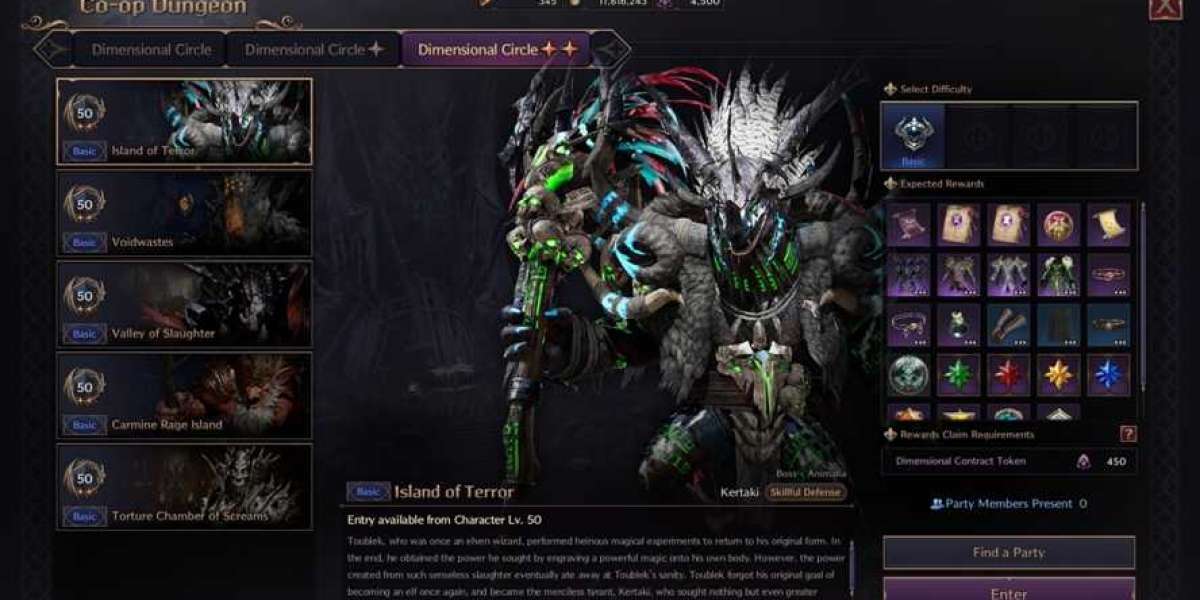
The Island of Terror is categorized as a 2-star dimensional circle dungeon.
In this challenging environment, players will encounter Kertaki, a formidable wildkin boss.
This guide aims to outline essential information about the dungeon,
including effective strategies for overcoming Kertaki.
Additionally, it covers the various mechanics involved,
as well as the rewards players can expect to earn.
To conquer Kertaki, the wildkin boss, you'll need to employ strategic teamwork and maintain focus throughout the encounter. Here's a detailed breakdown to help you navigate the dungeon effectively.
Understanding Kertaki
- Type : Wildkin
- Passive Ability : Skillful Defense – boosts endurance for all participants.
Kertaki's Fight Mechanics
Kertaki executes a series of distinct phases during the battle: the Rat Transformation phase, Meteor and Blue Flame phase, and Geyser Vents phase. The cycle repeats after completing these three phases.
Phase Breakdown and Strategies
-
Rat Transformation Phase
-
Activation : Triggered at 90% health, Kertaki transforms players into rats and creates a green fear-inducing ring.
- Goal : Successfully navigate the battlefield while avoiding Kertaki's attacks and the fear ring as rats.
Key Strategies :
- Utilize the burrow skill (replaces skill 1) to dodge attacks, as failure to do so can lead to instant defeat.
- Ensure not all players burrow simultaneously to provide Kertaki with a target.
- Only unburrow when Kertaki is at a distance to minimize risk.
-
Once this phase concludes, the fear ring fades, allowing Kertaki to be briefly stunned. Use this opportunity to collect flowers and prepare for the next phase.
-
Meteor and Blue Flame Phase
-
Activation : Kertaki summons meteors that create blue flames upon landing.
- Goal : Step on the blue flames to gain a debuff that clears the fog around geysers and flowers.
Key Strategies :
- Be aware that the blue flame debuff inflicts damage over time, so healers should be on standby.
- Clear the fog surrounding geysers and flowers in anticipation of the upcoming phases.
-
Tanks should maintain aggro during this phase to keep Kertaki from unleashing its powerful wrath attack.
-
Geyser Vents Phase
-
Activation : Following the second meteor, Kertaki unleashes a massive area-of-effect (AoE) attack.
- Goal : Position yourself on a charging geyser to be launched into the air, avoiding the AoE attack.
Key Strategies :
- Designate geyser locations to streamline movement and coordination.
- If Kertaki's health drops below 50%, expect a second AoE wave, necessitating the use of consecutive geysers for dodging.
Kertaki's Attack Patterns
- Fireball Attack : Kertaki releases three fireballs in rapid succession, with the last fireball causing a stun on impact.
By mastering these phases and strategies, your team will be well-equipped to face Kertaki and emerge victorious from the dungeon. Tanks should prioritize absorbing damage * to shield their teammates effectively.
- Melee Spin Attack
- This attack involves spinning and inflicts substantial damage on nearby players.
-
Tip: Blocking the attack reduces the damage taken.
-
AOE Charge Attack
- This is a powerful area-of-effect attack that targets all players in the vicinity.
- Tip: Rolling or dodging can help you avoid this attack; ensure tanks keep aggro to prevent Kertaki from targeting players too far away.
Island of Terror Dungeon Overview
The Island of Terror is classified as a 2-star dimensional circle dungeon featuring Kertaki, a wildkin boss with complex mechanics. This guide delivers a structured approach to exploring the dungeon, defeating the minibosses, and ultimately defeating Kertaki.
Dungeon Navigation Steps
- Activating the Reptilian Brazier
- Goal: Jump down from the cliff and make your way into the first room.
-
Strategy: The tank should engage enemies located to the right of the stairs while the rest of the team lights the brazier. This tactic allows the group to bypass most of the enemies in the central area. Once the brazier is activated, move towards the gate to confront the Infuriated Reptilian Butcher.
-
Butcher Mechanics:
- Health Phase: At below 50% health, the butcher turns invisible and becomes untargetable.
- Counter Strategy: The tank must keep aggro while other team members interact with the luminescent coral to reveal the miniboss.
-
Rescuing the Merchant
- Goal: In the next room, save the merchant to advance further.
-
Strategy: The tank should take the left path to attract the attention of nearby mobs, allowing DPS players to manage the enemies without risk. After rescuing the merchant, head straight to the miniboss area, taking down two reptilian enemies en route.
-
Executioner Mechanics:
- Fire Wave Attack: This miniboss employs fire-based attacks that can deal substantial damage.
- Counter Strategy: Players must jump over the fire waves to avoid serious damage, as it can be fatal to most players.
-
Utilizing the Geyser
- Goal: After defeating the executioner, use the geyser to reach the next segment of the dungeon.
- Strategy: In the following room, the tank should once again attract enemy aggro, allowing the party to safely navigate to the Infuriated Reptilian Gladiator.
Gladiator Mechanics
(Details to follow based on dungeon progression)
Miniboss Combat Strategies
-
Charge Attack : The gladiator targets a player and executes two consecutive charges during the encounter.
-
Pillar Stun : Aim to draw the miniboss towards a pillar to momentarily immobilize it, creating an opportunity for increased damage.
-
Bind Mechanic : When the gladiator charges for the second time, the chosen player becomes bound, limiting their actions.
-
Counter Strategy : Utilize the longbow’s Purifying Touch ability to free the bound player from their restraints.
-
Devastating AoE Attack : Once the miniboss reaches a critical health threshold, it performs a formidable area-of-effect attack.
-
Damage Mitigation : Equip skills from greatswords, spears, or wands to reduce the damage taken during this high-risk moment.
Final Recommendations : * Team Coordination : Tanks must effectively hold aggro and lead the group through every encounter phase.* Environmental Interactions : Utilize luminescent coral and surrounding pillars to navigate miniboss mechanics successfully.* Strategic Skill Usage : Reserve Purifying Touch and damage mitigation abilities for pivotal moments to enhance the team's chances of survival.
By adhering to this guide and mastering each phase's mechanics, players can triumph in the Island of Terror and reap their rewards.
Throne and Liberty Lucent: What are They and How to Get
Throne and Liberty Lucent is the premium in-game currency in TL Lucent , vital for acquiring items in the shop and Auction House. It allows players to purchase exclusive skins, powerful equipment, and more, greatly enhancing their gameplay experience. Players can earn Lucent through quests, events, and daily activities, or for those seeking quick access, it can be purchased from platforms like LootBar, known for offering secure transactions at competitive prices. Once acquired, Lucent is typically available immediately, although there might be a brief holding period for use in the Auction House.
Why Buy Throne and Liberty Lucent on LootBar?
If players want to top up Throne and Liberty Lucent, they may want to consider the lootbar game trading platform. One of the primary benefits of using lootbar.gg is its competitive pricing, offering some of the lowest prices for Lucent in the market. This ensures that gamers, especially those on a budget, can get the most value for their investment. By choosing to buy Throne and Liberty Lucent through this platform, players can enjoy significant savings while enhancing their gaming experience.
Moreover, lootbar.gg prioritizes safe transactions, providing a reliable platform for purchasing in-game items without compromising account security. This feature ensures that players can buy Throne and Liberty Lucent with peace of mind, knowing their account details are protected. Additionally, the user-friendly interface of lootbar.gg allows for a seamless experience, enabling players to quickly find and purchase the Lucent they need to advance in the game. This combination of affordability, security, and ease of use makes lootbar.gg an excellent choice for those looking to top up their in-game currency efficiently.
A Step-by-Step Guide to Buy Throne and Liberty Lucent on LootBar
To top up Throne and Liberty Lucent on the Lootbar trading platform, start by visiting the Lootbar website and determining the amount of Lucent you wish to purchase. Once you've made your decision, click on the "Purchase Now" button to proceed with your order. Next, ensure that your in-game character is over level 40 and has access to the Auction House. List an item for sale, which can include armor, weapons, crafting materials, or accessories. Remember to set the total price for your item carefully, as this will be a crucial part of the transaction process.
After posting your item on the Auction House, fill out the necessary information on the Lootbar platform. This includes details such as your region, server, item name, unit, and total price. It's important to provide a clear screenshot of the posted item, capturing its characteristics and stats for verification. Once all steps have been completed, your Lucent should be transferred to your account within 15 minutes to 2 hours. Keep in mind that while Lootbar facilitates the Throne and Liberty buy process, any commission fees incurred from trades in the Auction House are not covered by the platform.


